Sunday, April 23, 2017

How To Use MPPS V18 Bootmode Recovery EDC15

But aparently none of them described how to do this exatcly, i mean how to write with mpps in bootmode. Everyone was saying that is “simple, just write in bootmode”, “MPPS can recover almost any EDC15 ECU”, “I’ve done many times” an so on.

I found this very hard to do, and while searching decided that if i succeed to recover i will do a simple instructions how to do it without asking too many dumb questions.

So here it is in very short description, with pictures.


Note: You do this on your own, and i cant be responsible for mistakes you make!


  1. Remove the ECU. Warm it a little bit up, there is a sealnt which holds the housing halves pretty strong, so after warming will be easier to open it. Dont heat it too much, just to be hand warm. Here is the picture, this is what you will probably see inside the ECU case.
MPPS-V18-bootmode-Recovery-EDC15 (1


  1. 29F400 Location and bootmode pin 24. For now you have to solder a wire to the pin. To the other end of the wire connect 5k resistor. That’s it for now. Here are the picture of the chip, and the pin to be used.

MPPS-V18-bootmode-Recovery-EDC15 (2)


  1. Prepare all the connections to the ecu and MPPS cable as shown on the picture below.

MPPS-V18-bootmode-Recovery-EDC15 (3


MPPS Cable Pinout: (it’s mpps v12, but out of date; now is mpps v18)
MPPS-V18-bootmode-Recovery-EDC15 (4


  1. Pin16 = +12v

  1. Pins 4&5 = Ground

  1. Pin 7 = K Line


  1. When all done and checked twice, connect your MPPS cable to PC, open software and locate the BOOTMODE wirte function. This was tricky for me, but finally i got to this point and after that everything was a peace of cake. Before connectin the +12v power supply to the proper cable as you have seen in the pictures above. And before connecting the negative wire be sure to ground the bootmode pin 24 thru a 5k resistor, and remove it after aprox 15 seconds, but do not disconnect the ecu and MPPS power connections.


  1. Navigate to where you choose brand and choose not VW or Audi etc. but choose GENERIC. I found this Hardly noticable, and found only after a hint in the internet after 16 hours of searching.
MPPS-V18-bootmode-Recovery-EDC15 (5


After that choose your ECU as stated in the List that opens after you choose GENERIC
MPPS-V18-bootmode-Recovery-EDC15 (6


  1. Click Checksum Open the file that you want to checksum, the open the file that you have read from your car before making any mods. Above the progress bar you will see something written in GREEN color, and you’re good to go. Then click Write, choose the file to write and wait fo a while for the progress bar to reach 100% and you are done, and as happy as i was that i have saved some $$ on buying programmers, or used ECU’s, or sending to a tuner for a fix.


Enjoy!


(BIG THANKS TO the contributor in the MH community)

Friday, April 7, 2017

How To Install FGTech Galletto V54 correctly with Win 7

Here is our customer experience of how to install FGTech Galletto V54 correctly with Windows 7
(Big thanks to Mr.Tim Thiessen ,good info to share with  FGTech Galletto users in obdexpress.co.uk)

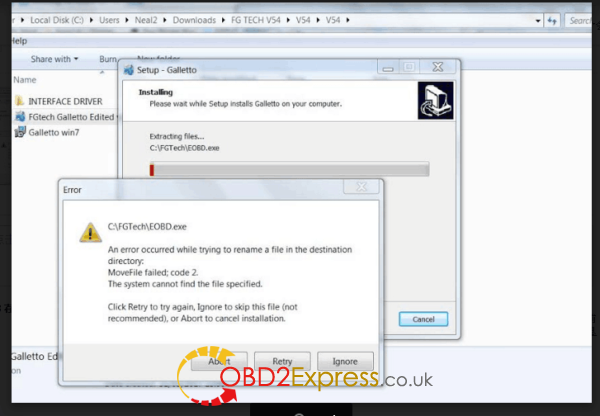
Here is the error when he was installed the FGTech Galletto V54 on Windows 7
FGTech-Galletto-V54-install-on-win7-error

Solution :
Hello, I would like to explain to you step by step how to install your FGTech Galletto V54 correctly with Windows 7. To do this, you must first uninstall the already installed software and the drivers.
Then we start with step:
1. Run “FGTech Galletto Edited v1.0.exe” as an administrator. Important: Do not create a desktop icon and run the program yet.
2. Next, connect the Galletto device to the power supply and then connect it via USB. The automatic driver installation fails. But do not worry, the installation is done manually.
3. Right-click on the “Computer” icon and select “Manage”. As soon as the window opens, click on Device management and select the USB port “FGTech”. Here you have to click “Update driver software”. And then click “Browse the computer for driver software”, then “Select from a list of device drivers on the computer”, then “Have Disk” and “Browse”.
4. Now look for the folder of “FGTech” on drive C. Here you open the folder “fgtech_new_driver” and select the following file: “fgtibus.inf”! Confirm everything, wait for the installation, and close all windows.
5. Run “FGTech Galletto Edited v1.0.exe” again as an administrator. Important: Do not create a desktop icon and run the program yet.
6. Run “Galletto win7.exe” as administrator. Create and install the desktop icon. If the installation is complete, start the program as an administrator.
7. Ignore the next two windows with hints and confirm with OK. FINISHED!!!
Hopefully this guide is understandable.

Thursday, April 6, 2017

How to use Kess V2 without “Protocol not compatible with version FW”

I also solved the problem with Kess v2 clone, with error “Protocol not compatible with version FW”. Now the error no longer appears. Cheers!


The error message: “Protocol not compatible with version FW”

Systems can be: Windows 7 and Windows XP….both OK

Here are the instructions:
Solution for Kess v2 FW protocol error

Here, I would like to show you step by step how to use your Kess v2 without the error “Protocol not compatible with version FW”.

To do this, you first have to uninstall the already installed software and the drivers.

Afterwards we start with step:
  1. Disable Internet connection
  2. Install the K-Suite 2.06 Full Version including drivers (Microsoft Visual C ++ 2005 SP1 and USBDEVICEDRV 1.00.011). The Kess device is not yet connected to your computer.
  3. After successful installation, K-Suite will open automatically (no error message may occur during installation, otherwise you will have to repeat the installation). Select the desired language and exit the program.
  4. Now you have to connect the Kess device via USB and wait for the automatic driver installation. (K-Suite not yet opens)
  5. Right-click the K-Suite icon to open the file path. (Win-XP: right-click on the K-Suite icon, then open the properties, in the lower left you can open the file path) Marks the entire content in the folder and deletes it.
  6. Opens the “Token Reset Folder” and copies the entire contents (it is the data from K-Suite 2.08). Now you change back to the already installed file path (here you just deleted all files) and insert the copied records. In addition, you copy the help folder (can be found on the supplied CD) and also paste it into the already installed file path. Now you can close all windows and start K-Suite.

The Kess device will now be updated. This may take a little time. As soon as the main menu of K-Suite opens, version 2.08 should be visible. The message “Protocol not compatible with version FW” should no longer appear. If everything was successful, you can close K-Suite again and install the updates (2.10, 2.12, … etc) one at a time. The Kess device can remain connected to the computer. The important thing is that you only install the updates. Not the drivers (Microsoft Visual C ++ 2005 SP1 and USBDEVICEDRV 1.00.011).

PS: If the error message “External exception EEFFACE” appears, you must close the program. Now disconnects the Kess device, reinstalls the version at which this error occurred. This time with the USBDEVICEDRV 1.00.011, but without Microsoft Visual C ++ 2005 SP1. After installation reconnect the Kess device and start K-Suite.

I currently have the version 2.32 Ksuite, and it works perfectly.
Hopefully this guide is understandable.


(BIG THANKS to the contributor; good info to share with kess v2 users in obdexpress.co.uk)